14. Setting up IPS/inline for Linux
14.1. Setting up IPS with Netfilter
In this guide, we'll discuss how to work with Suricata in layer3 inline
mode using iptables.
First, start by compiling Suricata with NFQ support. For instructions
see Ubuntu Installation.
For more information about NFQ and iptables, see
NFQ.
To check if you have NFQ enabled in your Suricata build, enter the following command:
suricata --build-info
and make sure that NFQ is listed in the output.
To run Suricata with the NFQ mode, you have to make use of the -q option. This
option tells Suricata which queue numbers it should use.
sudo suricata -c /etc/suricata/suricata.yaml -q 0
14.1.1. Iptables configuration
First of all, it is important to know which traffic you would like to send to Suricata. There are two choices:
- Traffic that passes your computer
- Traffic that is generated by your computer.
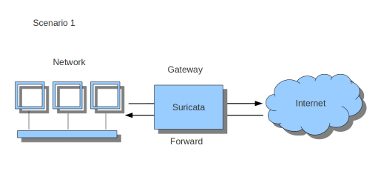
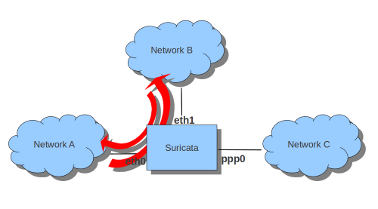
If Suricata is running on a gateway and is meant to protect the computers behind that gateway you are dealing with the first scenario: forward_ing .
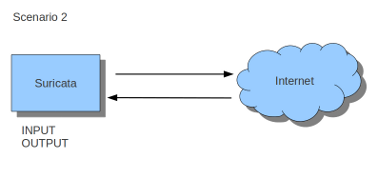
If Suricata has to protect the computer it is running on, you are dealing with the second scenario: host (see drawing 2).
These two ways of using Suricata can also be combined.
The easiest rule in case of the gateway-scenario to send traffic to Suricata is:
sudo iptables -I FORWARD -j NFQUEUE
In this case, all forwarded traffic goes to Suricata.
In case of the host situation, these are the two most simple iptables rules;
sudo iptables -I INPUT -j NFQUEUE
sudo iptables -I OUTPUT -j NFQUEUE
It is possible to set a queue number. If you do not, the queue number will be 0 by default.
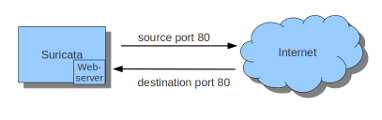
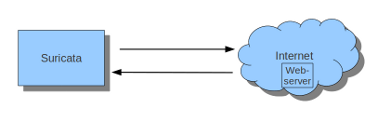
Imagine you want Suricata to check for example just TCP traffic, or all incoming traffic on port 80, or all traffic on destination-port 80, you can do so like this:
sudo iptables -I INPUT -p tcp  -j NFQUEUE
sudo iptables -I OUTPUT -p tcp -j NFQUEUE
In this case, Suricata checks just TCP traffic.
sudo iptables -I INPUT -p tcp --sport 80  -j NFQUEUE
sudo iptables -I OUTPUT -p tcp --dport 80 -j NFQUEUE
In this example, Suricata checks all packets for outgoing connections to port 80.
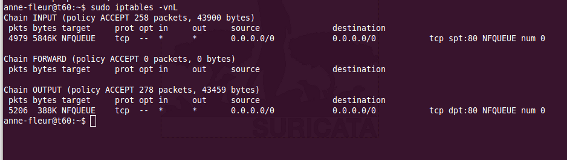
To see if you have set your iptables rules correct make sure Suricata is
running and enter:
sudo iptables -vnL
In the example you can see if packets are being logged.
This description of the use of iptables is the way to use it with IPv4. To
use it with IPv6 all previous mentioned commands have to start with ip6tables.
It is also possible to let Suricata check both kinds of traffic.
There is also a way to use iptables with multiple networks (and interface cards). Example:
sudo iptables -I FORWARD -i eth0 -o eth1 -j NFQUEUE
sudo iptables -I FORWARD -i eth1 -o eth0 -j NFQUEUE
The options -i (input) -o (output) can be combined with all previous mentioned
options.
If you would stop Suricata and use internet, the traffic will not come through.
To make internet work correctly, first delete all iptables rules.
To erase all iptables rules, enter:
sudo iptables -F
14.1.2. Nftables configuration
NFtables configuration is straight forward and allows mixing firewall rules with IPS. The concept is to create a dedicated chain for the IPS that will be evaluated after the firewalling rule. If your main table is named filter it can be created like so:
nft> add chain filter IPS { type filter hook forward priority 10;}
To send all forwarded packets to Suricata one can use
nft> add rule filter IPS queue
To only do it for packets exchanged between eth0 and eth1
nft> add rule filter IPS iif eth0 oif eth1 queue
nft> add rule filter IPS iif eth1 oif eth0 queue
14.1.3. NFQUEUE advanced options
NFQUEUE mechanism supports some interesting options. The nftables configuration
will be shown there but the features are also available in iptables.
The full syntax of the queuing mechanism is as follows:
nft add rule filter IPS queue num 3-5 options fanout,bypass
This rule sends matching packets to 3 load-balanced queues starting at 3 and ending at 5. To get the packets in Suricata with this setup, you need to specify multiple queues on command line:
suricata -q 3 -q 4 -q 5
fanout and bypass are the two available options:
- fanout: When used together with load balancing, this will use the CPU ID instead of connection hash as an index to map packets to the queues. The idea is that you can improve performance if there’s one queue per CPU. This requires total with a number of queues superior to 1 to be specified.
- bypass: By default, if no userspace program is listening on an Netfilter queue, then all packets that are to be queued are dropped. When this option is used, the queue rule behaves like ACCEPT if there is no program listening, and the packet will move on to the next table.
The bypass option can be used to avoid downtime of link when Suricata is not running but this also means that the blocking feature will not be present.
14.2. Settings up IPS at Layer 2
14.2.1. AF_PACKET IPS mode
AF_PACKET capture method is supporting a IPS/Tap mode. In this mode, you just
need the interfaces to be up. Suricata will take care of copying the packets
from one interface to the other. No iptables or nftables configuration is
necessary.
You need to dedicate two network interfaces for this mode. The configuration is made via configuration variable available in the description of an AF_PACKET interface.
For example, the following configuration will create a Suricata acting as IPS
between interface eth0 and eth1:
af-packet:
  - interface: eth0
    threads: 1
    defrag: no
    cluster-type: cluster_flow
    cluster-id: 98
    copy-mode: ips
    copy-iface: eth1
    buffer-size: 64535
    use-mmap: yes
  - interface: eth1
    threads: 1
    cluster-id: 97
    defrag: no
    cluster-type: cluster_flow
    copy-mode: ips
    copy-iface: eth0
    buffer-size: 64535
    use-mmap: yes
This is a basic af-packet configuration using two interfaces. Interface
eth0 will copy all received packets to eth1 because of the copy-*
configuration variable
copy-mode: ips
copy-iface: eth1
The configuration on eth1 is symmetric
copy-mode: ips
copy-iface: eth0
There are some important points to consider when setting up this mode:
- The implementation of this mode is dependent of the zero copy mode of AF_PACKET. Thus you need to set use-mmap to yes on both interface.
- MTU on both interfaces have to be equal: the copy from one interface to the other is direct and packets bigger then the MTU will be dropped by kernel.
- Set different values of cluster-id on both interfaces to avoid conflict.
- Any network card offloading creating bigger then physical layer datagram (like GRO, LRO, TSO) will result in dropped packets as transmit path can not handle them.
- Set stream.inline to auto or yes so Suricata switches to blocking mode.
The copy-mode variable can take the following values:
- ips: the drop keyword is honored and matching packets are dropped.
- tap: no drop occurs, Suricata acts as a bridge
Some specific care must be taken to scale the capture method on multiple threads. As we can't use defrag that will generate too big frames, the in kernel load balancing will not be correct: the IP-only fragment will not reach the same thread as the full featured packet of the same flow because the port information will not be present.
A solution is to use eBPF load balancing to get an IP pair load balancing without fragmentation. The AF_PACKET IPS Configuration using multiple threads and eBPF load balancing looks like the following:
af-packet:
  - interface: eth0
    threads: 16
    defrag: no
    cluster-type: cluster_ebpf
    ebpf-lb-file: /usr/libexec/suricata/ebpf/lb.bpf
    cluster-id: 98
    copy-mode: ips
    copy-iface: eth1
    buffer-size: 64535
    use-mmap: yes
  - interface: eth1
    threads: 16
    cluster-id: 97
    defrag: no
    cluster-type: cluster_ebpf
    ebpf-lb-file: /usr/libexec/suricata/ebpf/lb.bpf
    copy-mode: ips
    copy-iface: eth0
    buffer-size: 64535
    use-mmap: yes
The eBPF file /usr/libexec/suricata/ebpf/lb.bpf may not be present on disk.
See eBPF and XDP for more information.